Related Content
Content
How To Book Tickets on the DSB Website
This step by step guide shows how to use the DSB, Danish Railways website, to buy Danish train tickets, so that you can book and save with confidence!
Share
DSB is the national rail operator in Denmark, but when you first access the website you may see the Danish language version as shown below.
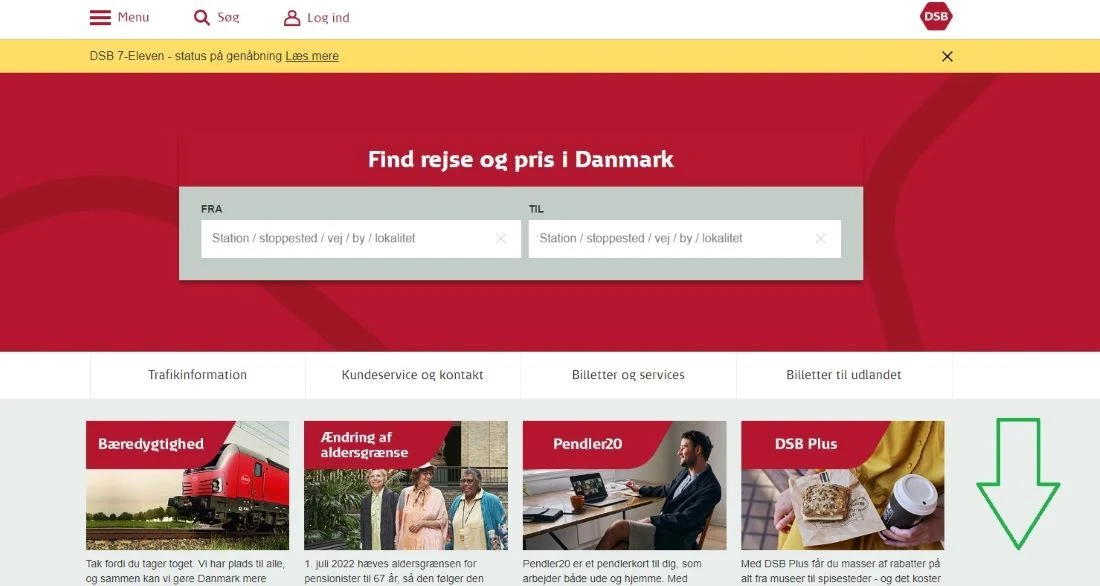
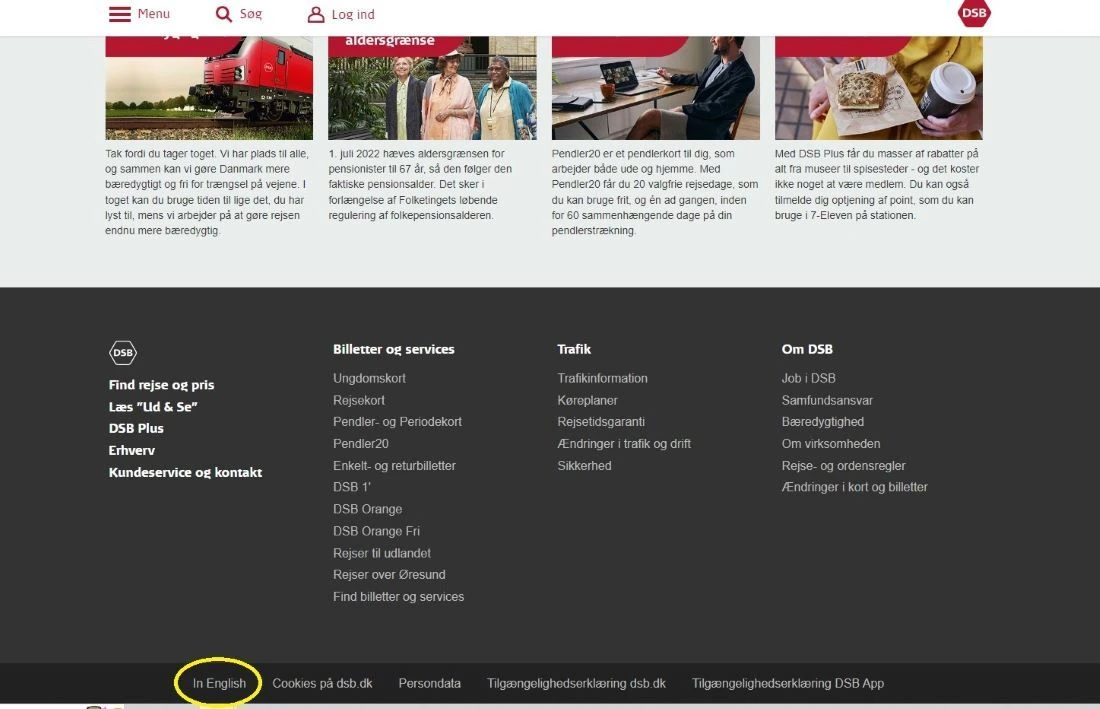
To access the English language version, you need to click the somewhat hidden link, which has been circled, at the foot of the page...
What is clear is that the English language version of the DSB website has less features than the Danish language version, though the core booking path for buying tickets is replicated.
All of the pages below are taken from the English language version.
Before beginning the booking procedure it can be a good idea to take a look at some of the additional information, which can be found by accessing the menu at top left.
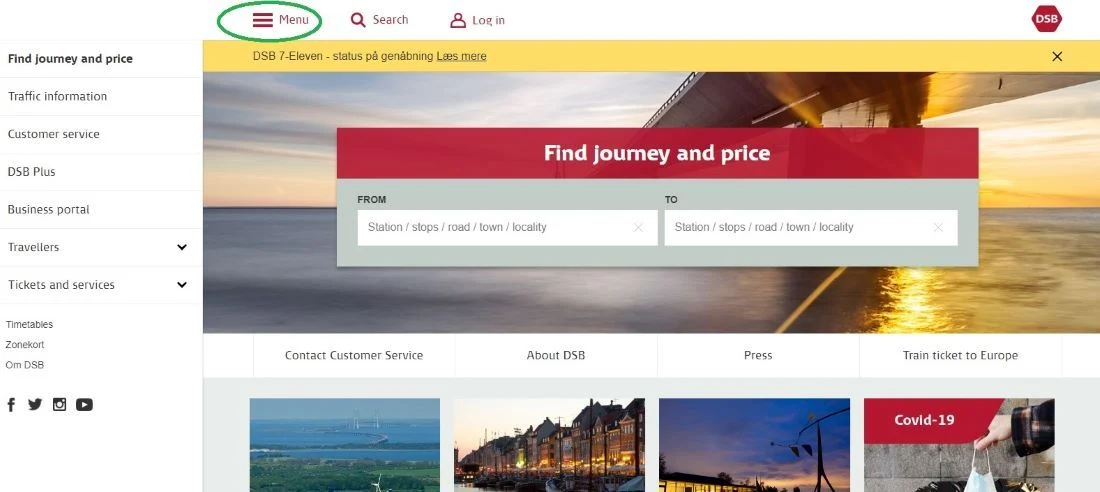
It can be particularly worth checking the info regarding the types of tickets which can be included in the search results when you look up a journey.
The 'Orange' tickets for long-distance journeys are money-savers, but as is typical with discounted tickets, they have more restrictive terms and conditions.
Or once you have accessed the English language version of the website, you can scroll back down to the foot of the page to access the info on the types of tickets.
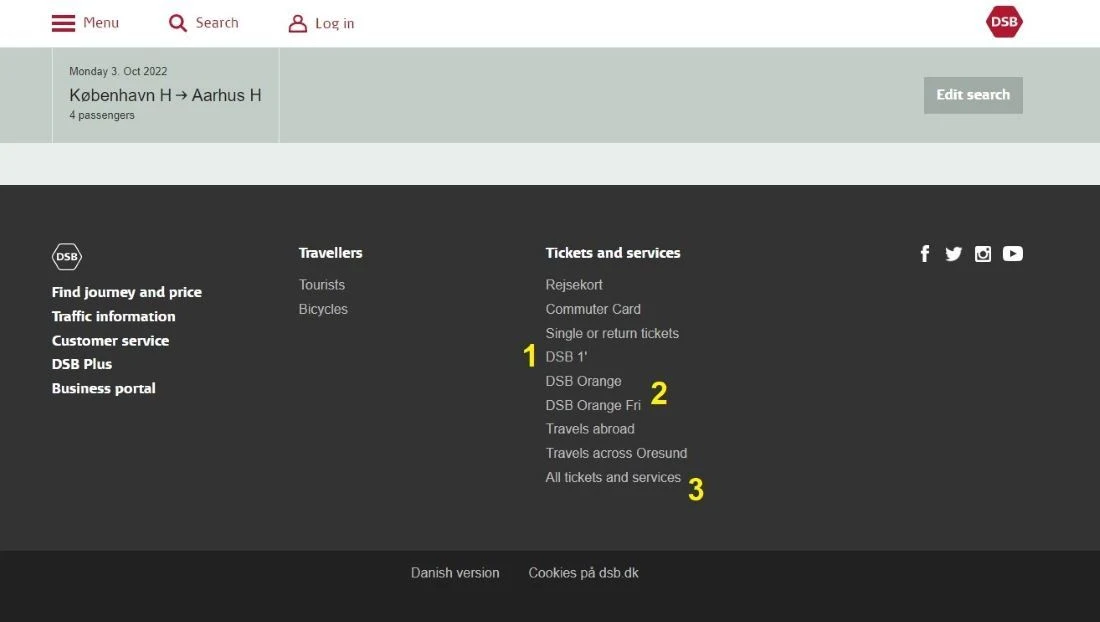
In summary:
- DSB 1 = first class tickets
- Orange tickets = discounted tickets available for journeys outside business hours
- This is where you can find info and access booking paths for some specific types of tickets that are required in certain scenarios, such as taking non-folding bicycles and dogs with you on Danish rail journeys, as seen below.
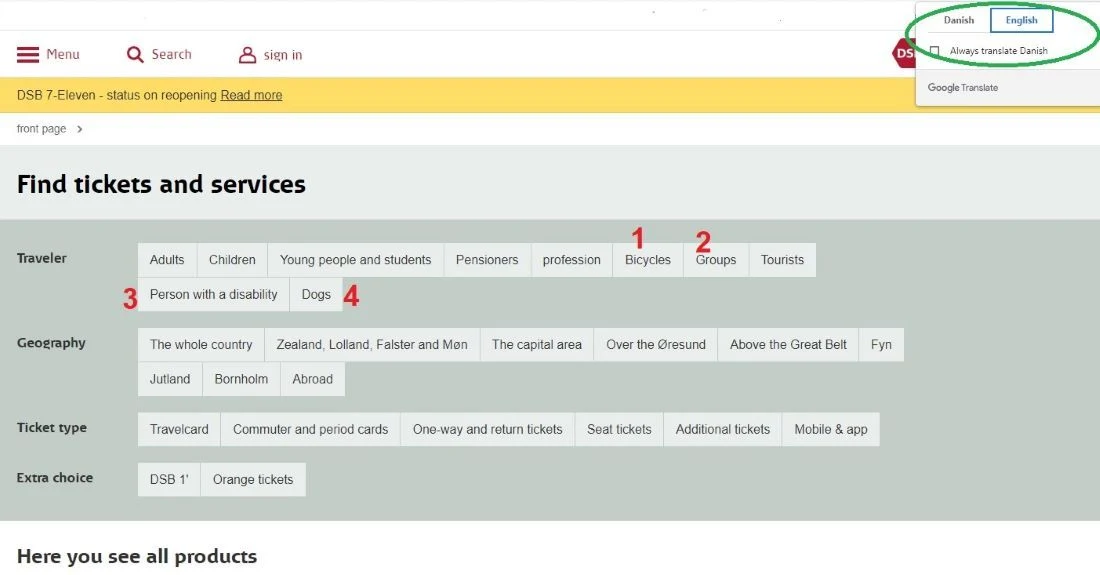
What has been circled in green at top right, is that despite having accessed the English language version of DSB, if you click on that 'All tickets and services' link on the DSB home page, this ticket info page will be presented in Danish, so you will need to use Google Translate.
As can be seen it is worth making the effort if, among other things, you will want to:
- take a non-folding bicycle
- book tickets for larger groups
- book tickets if you require mobile assistance
- take a dog with you on your journeys.
Click on those links and you'll either be able to access a specific booking path for those tickets, or ascertain how they can be booked; it isn't possible to add bikes and dogs etc when booking journey tickets on DSB, despite the requirement for them to have tickets.
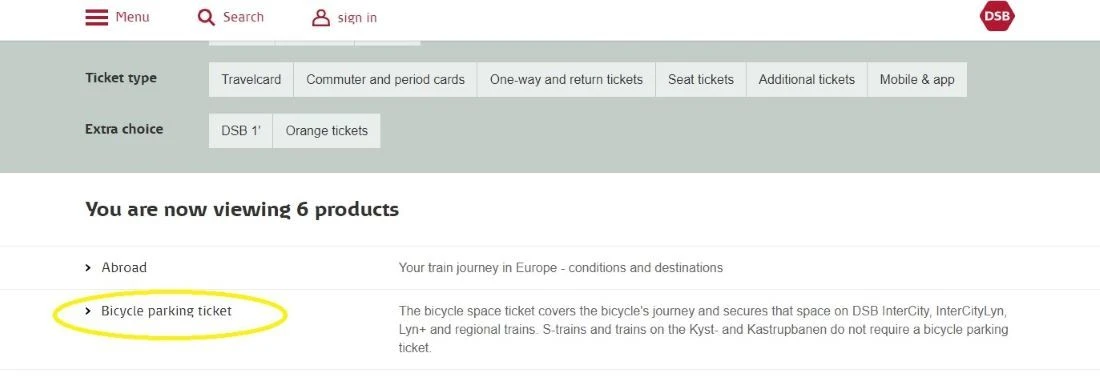
As can be seen below, you can follow this path to discover how to book bike tickets.
1. Searching For A Journey:
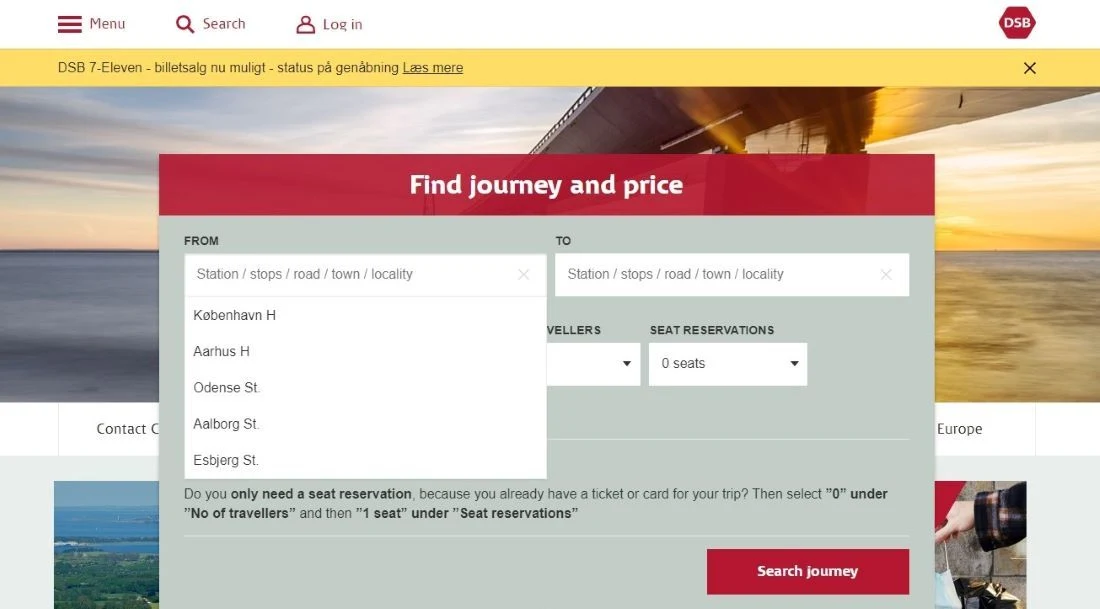
When beginning the search for a journey, when you click into 'From' and 'To' boxes, the five most popular stations in Denmark will automatically appear for selection.
If you want to travel to and from other stations, the names of them will appear for selection, you don't need to be concerned about not using Danish character for 'ø'.
Though you may need to type in more than five characters in order for your station to appear for selection.
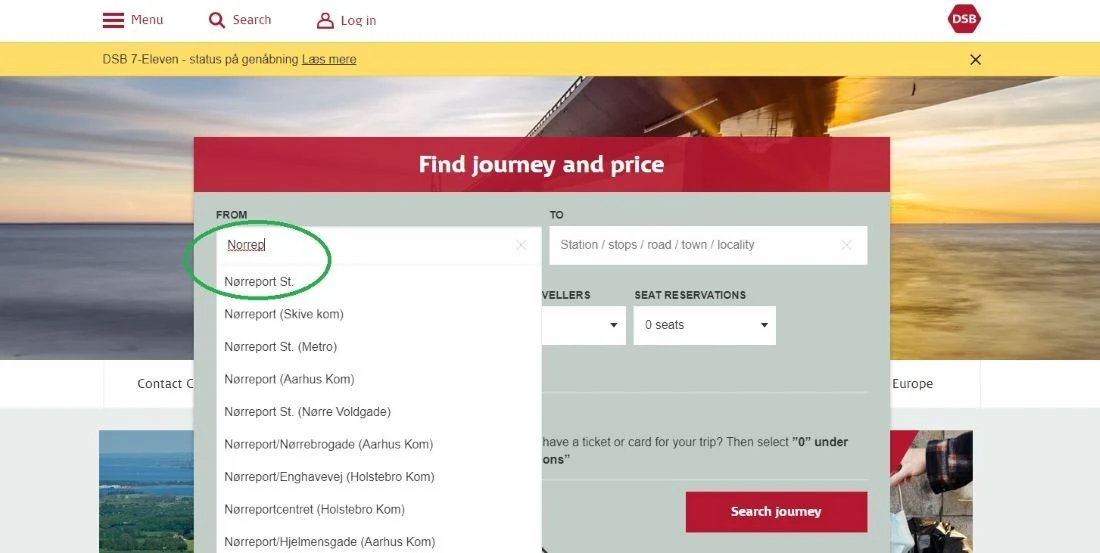
In this example below, a journey has been looked up from Nørreport, the station in Copenhagen that is closer to the city centre than København H, the main station in the Danish capital.
As can be seen 'Nørrep' had to be entered into the 'From' box for it to be listed for selection.
Changing the number of travellers:
If more than 1 Adult is taking the journey, click in the number of travellers box and the drop down menu shown will appear.
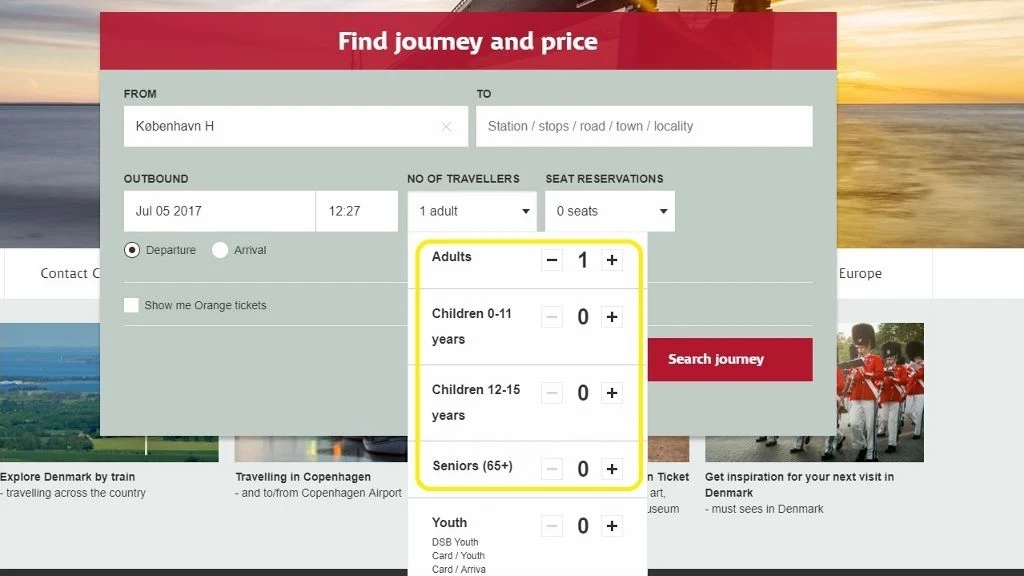
Use the '+' buttons to adjust the number of travellers.
Opting to add a seat reservation:
Optional seat reservations are available on the long-distance Lyntog and IC services and there are two methods of adding them to a ticket booking:
- When you reach the ticket booking stage, further along the booking path, there will be a facility to add a reseravation(s);
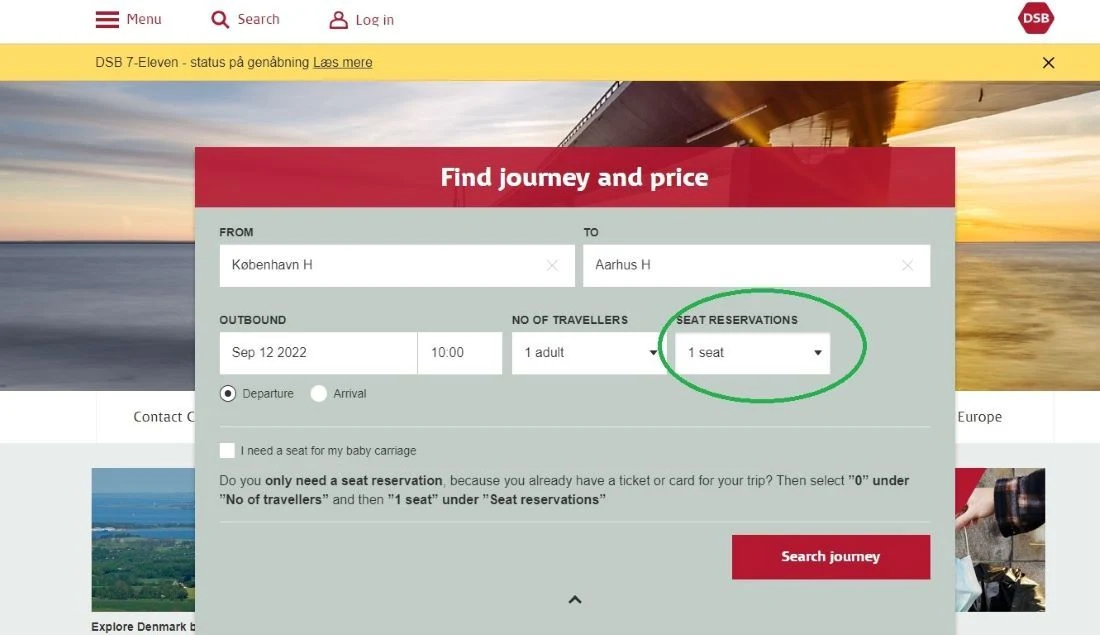
- Or as shown below, you can include that you want to reserve before you begin to look for a journey option.
The default on the DSB home page is that you won't want to reserve...
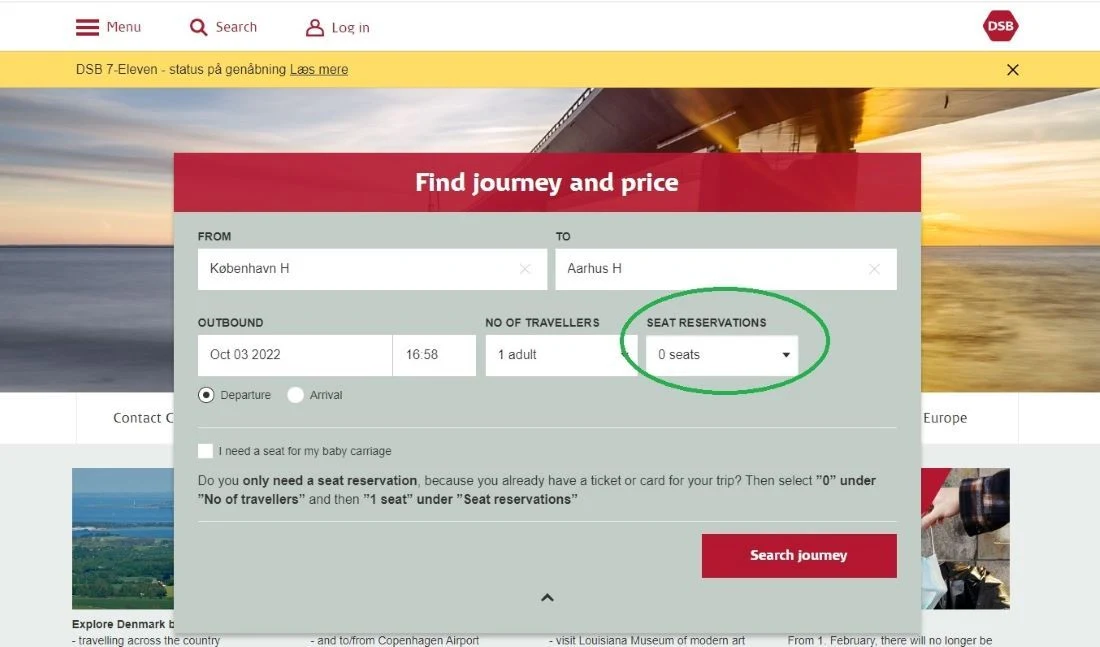
...so if you don't want to pay the optional seat reservation fee of 30kr, you don't need to take any action and can click on the red 'Search Journey' box.
Though if you do want to travel in a reserved seat, you can be proactive and include it, though take care to match the number of travellers to the number of seat reservations which you'll then require.
2. Using the journey search results:
Having searched for your journey you will see a (limited) choice of departure options, as per this example screen below.
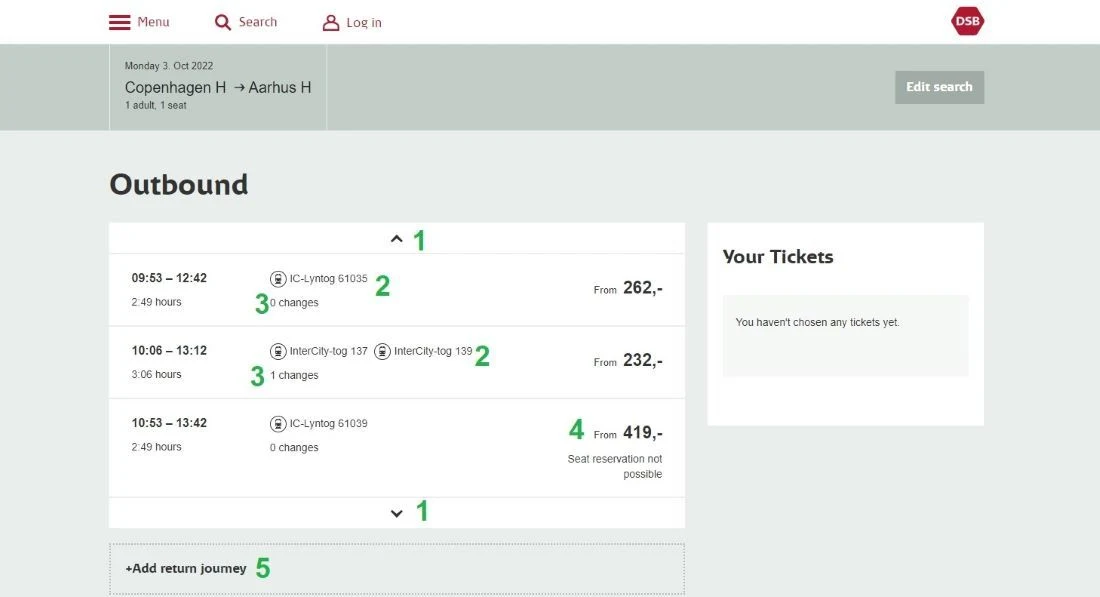
As can be seen the four aspects of this stage of the booking process most being aware of are:
- Only the first three departures after the time selected on the home page will be displayed.
However, departures leaving earlier or later on your travel date may be (much) cheaper; and DSB doesn't provide for any quick access to the cheapest price per day, or give any indication as to what that price will be,
So you can use these arrows to access earlier or later departures and check their respective prices. - These are the indicators of the type of train services; on this route the Lyn services are faster, and therefore typically more expensive, though the same types of train are used for the Lyn and IC services.
- '0' changes = a direct train, or the number of changes required will be shown.
- The price of the cheapest ticket available is shown.
Note that one departure in this example is significantly more expensive, because, at the time of the search being made, no discounted 'Orange' tickets were available for travel by it.
You can see above that when you initially search for a journey, the type of ticket(s) available is not shown at this stage of the booking process
However, the price of the ticket(s) is a good indicator of whether 'Orange' tickets are available for a particular departure; note the discrepancies between the cheapest prices per departure.
3. Choosing a type of ticket
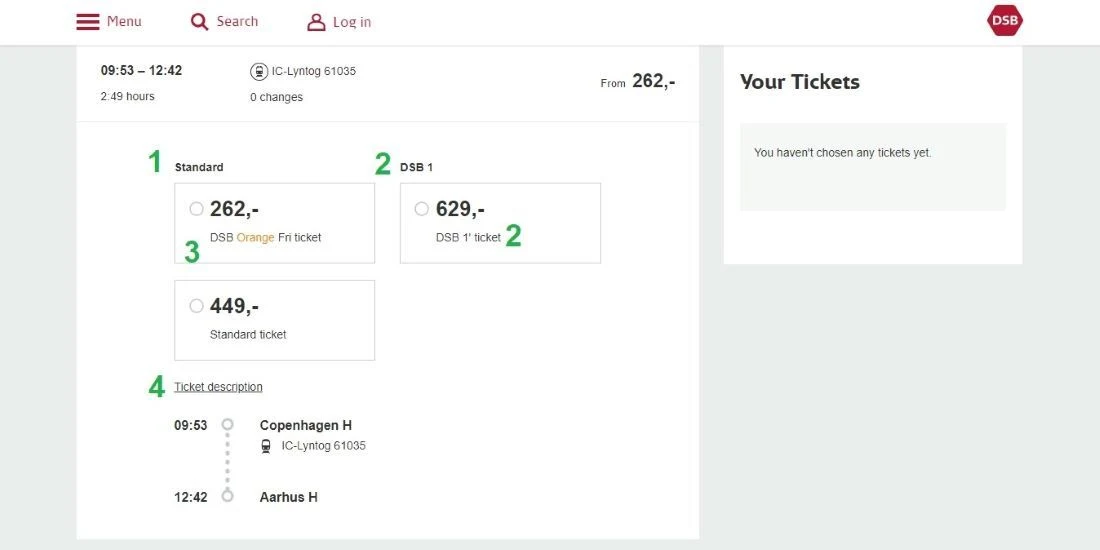
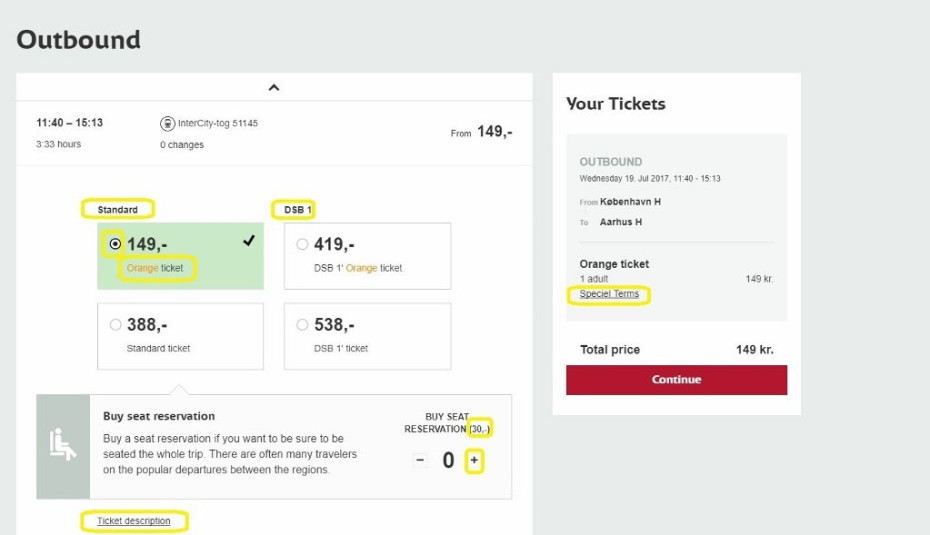
This is a key stage of the ticket booking process, the four things highlighted above are:
- In this left column the types of tickets available for travel in the equivalent of second class will be listed.
- Or you can select first class tickets, which is indicated by the use of 'DSB 1'.
- Note that on this specific departure two types of tickets are available for travel in Standard Class, one of which is 'Orange Fri' tickets. Though what can be a tad confusing is that 'Standard' is the name of second class on DSB and the non-discounted tickets are also known as Standard tickets, but if the different discounted 'Orange' tickets are available, they will be appear under the 'Standard' header.
- If you want to see the terms and conditions of using the Orange and Standard Tickets, you can access them by clicking on the 'Ticket Description' link.
Do so and the information you will see, will enable easy comparison between the terms of using both types of ticket, note that the word 'Orange' isn't clickable, so that isn't how to check the T&Cs of the 'Orange' tickets.
DSB used to provide the ability to only see journey options on which Orange tickets were available within the search results, but they now have to sought out, using the prices shown as a clue.
Though what can be particularly easy to miss is that there are now two types of Orange tickets and when looking up the departure details, either:
- no Orange tickets will be available at all, they are not made available on what will be popular departures and they can also sell out before a journey has been looked up.
- only 'Orange Fri' tickets will be available, as per the example above, or
- both types of Orange tickets will be available, as per the example below.
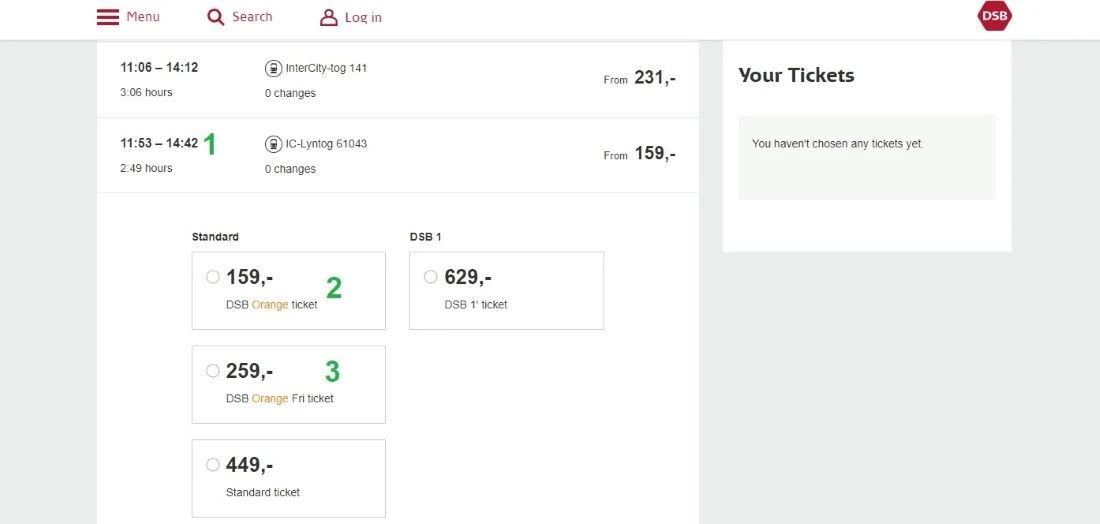
This different journey option is:
- departing at a time when demand is likely to be lower (in the middle of the day)
- so has 'Orange' tickets available, which are cheapest of all, but can't be exchanged or refunded if you subsequently change your travel plans
- also has 'Orange Fri' tickets available, which are more expensive, but have greater flexibility.
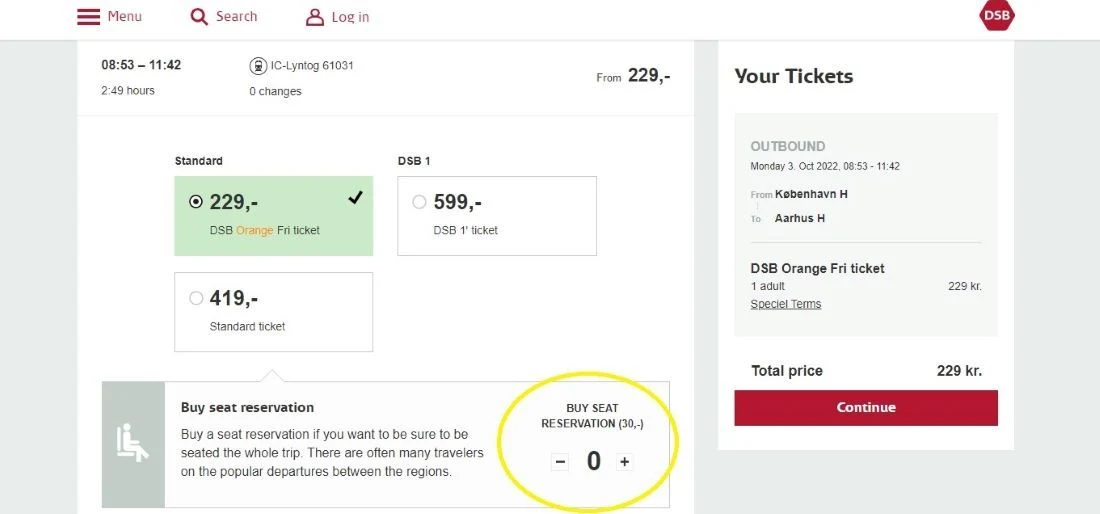
When you click in the boxes of any of the types of tickets, because you want to use that type of ticket, a tick will appear on it; as per the yellow circle below.
Additional information will appear over to the right (1), above the 'Continue' box, which you will click to move on to the payment stage of the booking process.
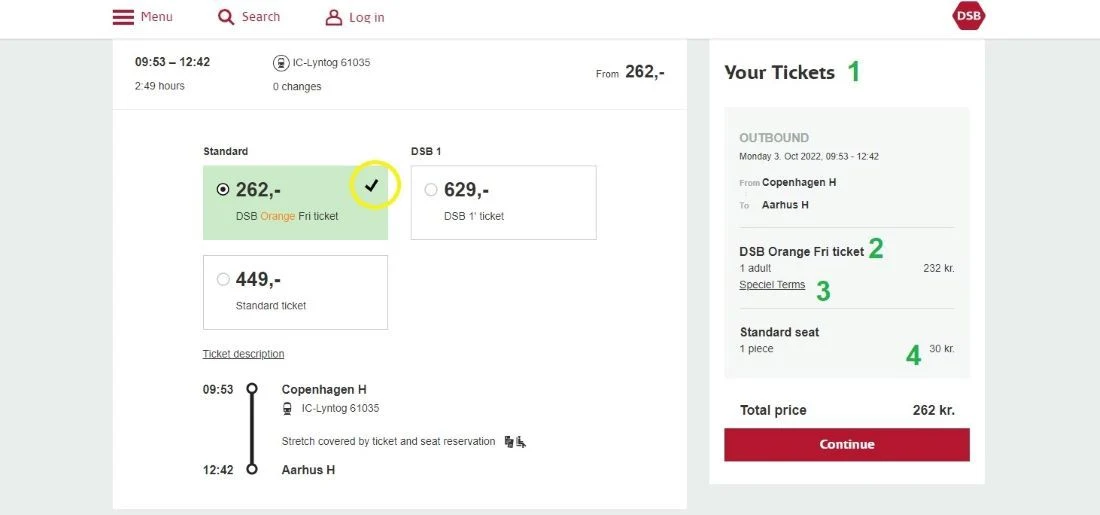
It can be tempting to simply click 'Continue' but there is some key info to be aware of in the 'Your tickets' column:
2. The name of the type of ticket will be repeated.
3. Another opportunity to check the T&Cs of that type of ticket will be presented - the 'Special Terms' link
4. A seat reservation was selected back on the home page, so the cost of adding it to the booking is shown here.
Reservations and choosing specific sets
If you didn't opt to add a seat reservation on the home page, prior to looking up a journey, you will be presented with another opportunity to do so, on the ticket selection stage of the booking process.
If you have opted to add a seat reservation at any stage, when you click 'Continue' to move along the booking path, you will be taken to a seat selection page.
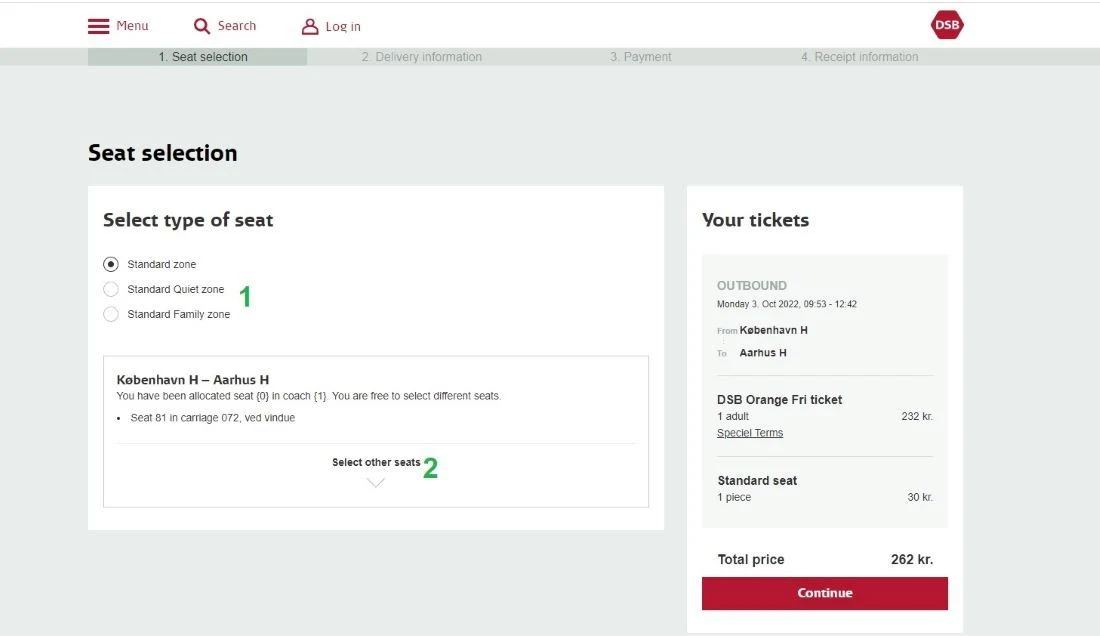
The two things to note are:
- The seat which you have been automatically assigned will be in a Standard zone, but you can opt to travel in a Quiet Zone in which mobile phone use is not permitted.
You can only opt to sit in the Family zone if you are booking tickets for a combination of adults and children, though if you will be travelling with a dog and children you need to travel in the Standard (class) zone as dogs are not permitted in family zones. - The details of the seat you have been assigned will be listed, but you won't know where it is, so to check its location you can click on 'Select other seats'.
You will then see a seating plan, an example of which is shown below; the green arrow which has been added, is indicating that you will need to scroll down, in order to see all the available zones within the train.
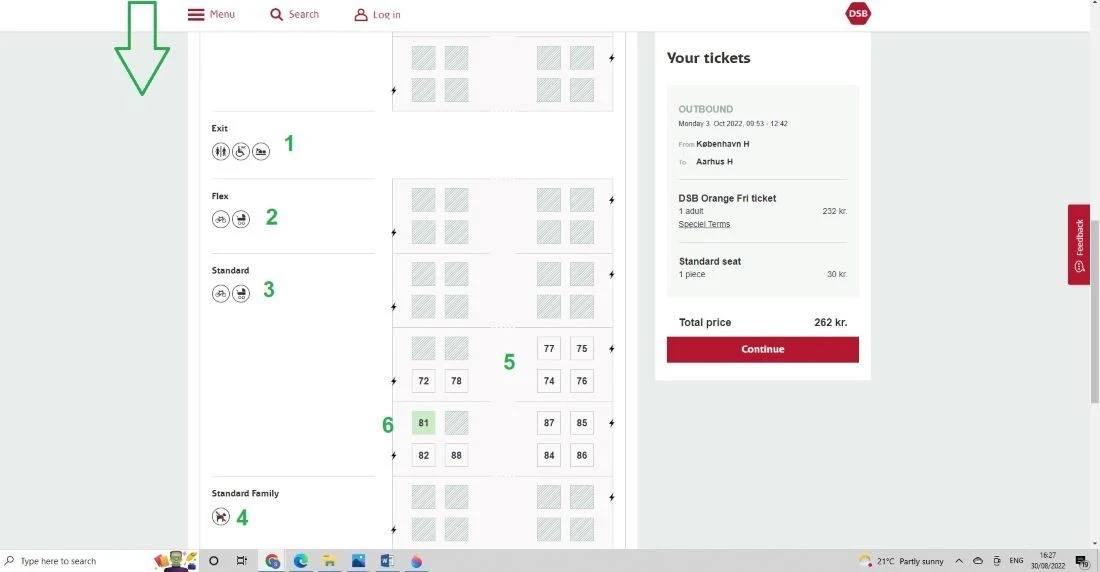
What has been pointed out is:
- This exit row is where the doors are located
- The 'Flex' zone is conveniently located close to doors so it is usually set aside for those travelling with bikes and baby carriers etc, as such items will need to be stowed by the doors Hence all the seats here being greyed out, which indicates unavailable
- This larger area is the 'Standard' zone.
- This is the family zone, which is greyed out as children weren't included when looking up the journey
- The alternative seats which are available to select, because they are in the standard zone, are those which are numbered.
- This green box indicates that this is the seat which has been pre-selected, it happens to be a window seat.
Note that there isn't an option to choose forward facing seats.
4: Booking your chosen tickets:
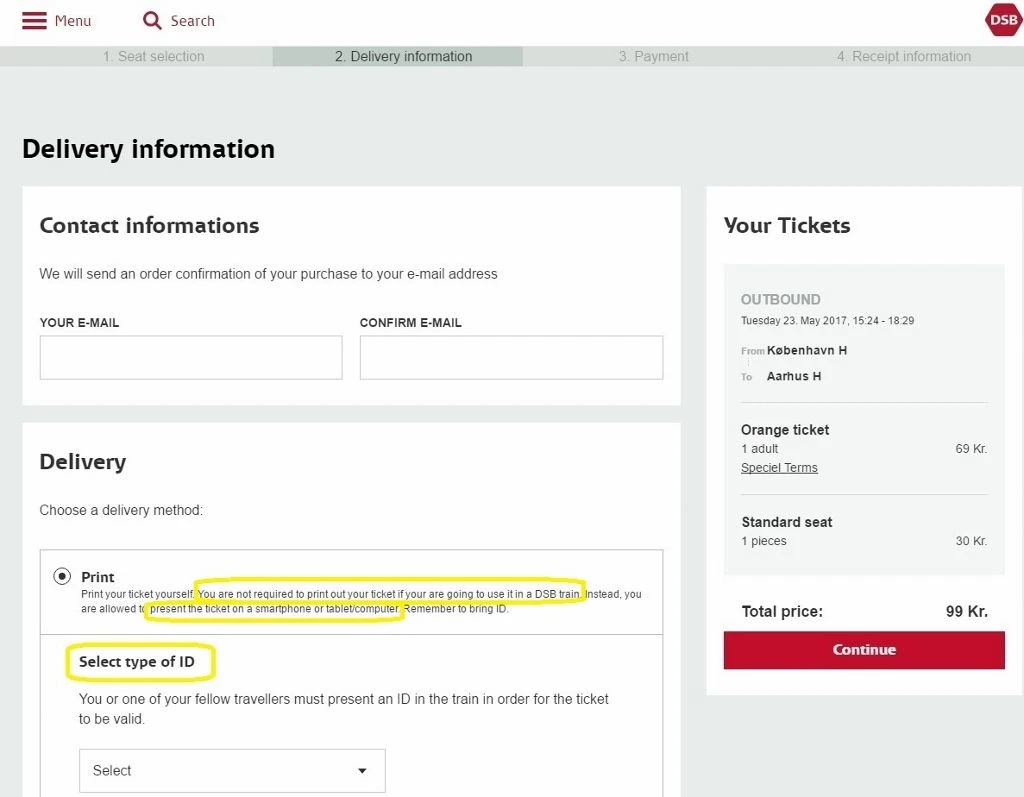
The purchase path on DSB is fairly standard, but as can be seen above there are THREE things worth noting at this first step of the booking path.
(1) You don't have a choice of delivery options, the ticket will be emailed to you.
There are no options to receive the tickets by post, or to collect at the station.
(2) But you don't have to print the ticket for it to be valid on the train.
The ticket will be attached to the email, but if you open the email on your smart phone/mobile device, you can download the attachment and save the ticketing document to your phone.
You can then show this document on your phone to the ticket inspector/conductor.
But what you can't do show is show the ticket/conductor the email - you need to have downloaded the ticketing documents.
(3) You need to have ID with you for your ticket to be valid, on the train the conductor/ticket inspector may ask to see your ID - and the ID you show needs to match whatever option you select here.
A passport is sure to be an acceptable form of ID - but if you select it here, don't then board the train without it!

Simon Harper
I wanted to share my passion for train travel and explain how anyone can take the fantastic journeys I have taken.

This is one of more than 100 train travel guides available on ShowMeTheJourney, which will make it easier to take the train journeys you want or need to make. As always, all images were captured on trips taken by ShowMeTheJourney.
This second version of ShowMeTheJourney is exciting and new, so we are genuinely thrilled that you are here and reading this, but we also need your help.
We’re striving not to let anything get in the way of providing the most useful service possible, hence a facility has been set up with DonorBox which can be used to support the running costs and make improvements.
Instead of advertising or paywalls, your financial support will make a positive difference to delivering an enhanced service, as there’s a lot of ideas which we want to make happen.
So if you have found the info provided here to be useful, please consider saying thank you.


